Download Driver Printer Toshiba E Studio 181 ((top)) – Fresh & Official
Title: The Last Ticket
Manual Installation (if no installer):
- Download the unpacked driver folder (
.inf files).
- Go to
Settings → Bluetooth & devices → Printers & scanners.
- Click
Add device → The printer that I want isn't listed.
- Select
Add a local printer or network printer with manual settings.
- Choose port (USB or Standard TCP/IP).
- Click
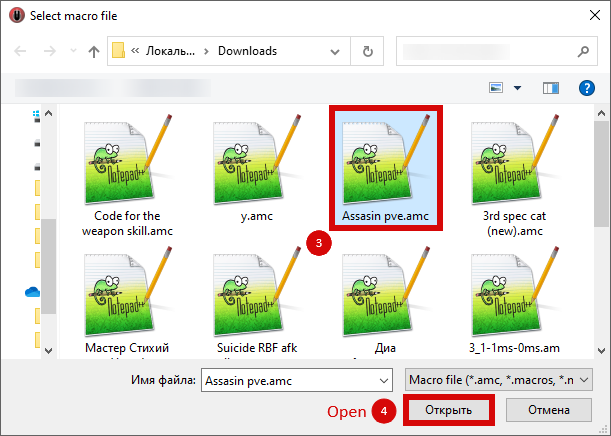
Have Disk → Browse to the .inf file.
- Select model
Toshiba e-STUDIO 181 → Complete installation.
If you need to get this machine running on your computer, follow this guide for safe download sources and installation steps. Download Driver Printer Toshiba E Studio 181
Right-click the downloaded file and select Extract All to unpack the installation files. 3. Install the Driver Drivers & utilities | Toshiba Tec Europe Title: The Last Ticket Manual Installation (if no
For Network Connection:
- Ensure the e-STUDIO 181 has a static IP address (check device panel:
User Functions → Admin → Network).
- Run the driver installer → Choose “Network”.
- Enter the printer’s IP address when prompted.
- Finish installation → Add printer via Windows Settings if not auto-added.
Step 4: Troubleshooting Common Issues
| Problem | Solution |
| :--- | :--- |
| Driver not found for Windows 11 | Use the Toshiba Universal Print Driver v2 (works 99% of cases). |
| Print jobs stuck in queue | Change driver from GDI to PCL6 Universal Driver. |
| “Driver is unsigned” error | Disable driver signature enforcement temporarily: Shift + Restart → Troubleshoot → Startup Settings → Disable driver signature enforcement. |
| Printer offline after driver install | Ensure the printer’s NIC card is active (e-STUDIO 181 requires optional network interface kit). If USB connected, use a standard USB 2.0 cable. | Download the unpacked driver folder (
After some research, John discovered that the problem was likely due to a missing or outdated printer driver. The Toshiba e-Studio 181 printer driver was no longer compatible with his computer's operating system. Determined to get his printer up and running, John set out on a mission to download the correct driver.
Issue 4: Error Code "No GDI" or "Memory Overflow"
Solution: Reduce the print resolution. Go to Printer Properties > Advanced > Printing Defaults > Graphics. Change resolution from 600 dpi to 300 dpi.