?

3D Twisty 3x3 Cube Puzzle Simulator

Play with the online cube simulator on your computer or on your mobile phone.

Drag the pieces to make a face rotation or outside the cube to rotate the puzzle.

Apply a random scramble or go to full screen with the buttons.

Online Solver
×
Error messages will be shown when a cube is not scrambled properly.
Solution:
?

Rubik's Cube Solver

Calculate the solution for a scrambled cube puzzle in only 20 steps.

Set up the scramble pattern, press the Solve button and follow the instructions.

Use the color picker, apply an algorithm or use a random scramble.

Stopwatch
?

Cube Timer

Measure your solution times on your journey of becoming a speedcuber!

Use your Space button or click the clock to start and stop the cube timer.

With scramble generator and instant statistics calculator.

Tutorial

Knowing how to solve a colored twisty 3x3 cube puzzle, like the Rubik's Cube is an impressive skill, and with a bit of patience, it’s easier to learn than you might think. You'll soon discover that solving it doesn’t require genius, just determination and practice!

In this tutorial we are going to use the easiest layer-by-layer method.

💡
It's advised to watch the attached video tutorial while using this cheat sheet explaining each step.
1

White Edges

Let's start with the white face. Try to form a white plus sign on the top of the cube, making sure that the colors of the side stickers also match the colors of the lateral centers. This step shouldn't be too hard. First, try to do it without reading the examples below, taking the time to familiarize yourself with the puzzle.

white edges correct way

We can easily insert the edge to the top if you move it to the highlighted bottom-front spot first. Depending on where the white sticker is facing do the rotations.

insert first edge
Case A:
White sticker facing down:
F F
Case B:
White sticker facing  you:
D R F' R'

Case C:
When the white edge is stuck between two solved edges you can send it to the bottom layer doing this:

L D L'

face rotation lettersI used capital letters to mark the clockwise face rotations: F (front), R (right), L (left), U (up), D (down).

Turns in the opposite direction are marked with an apostrophe. (')

2

Finish The White Face

solve cube white corners
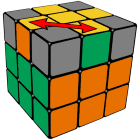
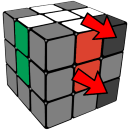
When the white edges are solved we can move on to solve the white corners.

First, place the white corner corresponding to the position marked by the upper arrow into one of the highlighted spots. Next, repeat the algorithm below until the white piece comes to its desired destination.

R' D' R D

This trick sends the piece back and forth between the top and bottom locations, solved white facetwisting the corner in each step. Using this trick you can solve each white corner in less than 6 iterations.

At the end your cube should have a solid white face with the lateral stickers matching the lateral centers.

3

Center Layer

Turn your cube upside down because we don't need to work with the white face anymore.

We have a trick to insert an edge piece from the top-front position to the middle layer. Do the "Left" or "Right" algorithm depending on which side you have to insert the piece:

how to do center layer

Left:  U' L' U L U F U' F'
Right:  U R U' R' U' F' U F

solved center layer
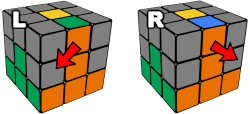
When a center layer piece is in its correct position, but oriented incorrectly then use the same algorithm to take it out, inserting another piece to replace it temporarily.

You'll have two solved layers when you finish this stage.
We're almost there.

Ad
4

Yellow Cross

Inspect the top of your cube. You will see either a dot, an L-shape, a line or a yellow cross. Our goal is to form a yellow cross and we have a trick to go from one state to the other:

how to solve the twisty 3d puzzle rubiks cube

F R U R' U' F'

Use this algorithm to shift from one shape to the next one.

5

Swap Edges

We have a yellow cross on the top but the edges are not in their final position yet. They need to match the side colors.

swap rubiks cube edges

R U R' U R U U R' U

Use these steps to swap the front and left yellow edges in the top layer.

6

Cycle Corners

Only the yellow corners are left unsolved at this point. Now we are going to put them in their final position and we'll rotate them in the last step.

Use the algorithm below to cycle the pieces in the direction marked with the arrows while the top-right-front piece is standing still.

cycle rubik cube puzzle algorithm
U R U' L' U R' U' L
7

Orient Corners

Everything is positioned, we just have to orient the yellow corners. We use the same algorithm that we used for solving the white corners in the second step:

R' D' R D

This step can be confusing for most people so read the explanation very carefully and do exactly what it says!

rotate pieces rubiks cube twisty puzzle solution
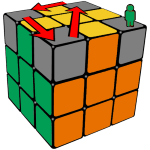
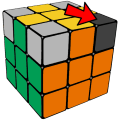
1. Hold the cube in your hand having an unsolved yellow corner in the highlighted top-right-front position.
2. Repeat the algorithm until this piece is solved.
3. Turn the top layer to bring another unsolved piece in the highlighted position.
4. Repeat R' D' R D until that one is also solved.
5. Do 3 and 4 for any other unsolved yellow corner.

Important!
⚠️ During the process it might seem that you have messed up the whole cube but don't worry because it will come together if you do it correctly, following the instructions.
⚠️ Always complete the whole R' D' R D algorithm, even if you see the yellow sticker pointing up. You still have to make a final D turn.

+

Video Tutorial

Watch these steps being explained in this video:

Back to top

Nrf24l01 Proteus Library Download [top] Link -

The nRF24L01 Proteus Library is a third-party add-on essential for simulating wireless 2.4GHz communication between microcontrollers like Arduino, PIC, or AVR within the Labcenter Proteus environment. Since Proteus does not include this module by default, these community-created libraries are the only way to test RF logic without physical hardware. ⚡ Quick Verdict Arduino Library for Proteus - The Engineering Projects

The NRF24L01 Proteus library provides a convenient way to simulate and test wireless communication projects. By following the steps outlined in this article, you can easily download, install, and use the library in your Proteus projects. With the NRF24L01 library, you can design and simulate a wide range of wireless communication applications, from simple remote control systems to complex IoT networks. nrf24l01 proteus library download link

Once the library is installed, you can search for "NRF24L01" in the component mode to add it to your schematic. To make the simulation functional, you must also set up the Arduino IDE with the appropriate RF24 library: The nRF24L01 Proteus Library is a third-party add-on

Electronics Tree Resources – Offers a rich collection of tested library models for Proteus 8.x. How to Install the Library in Proteus [ ] Downloaded

Important warning: Avoid exe files or shady link shorteners. The legitimate library is a .zip file containing two folders (LIBRARY and MODELS) and a Readme.txt.

.HEX (Optional): Sometimes included for pre-loaded firmware. How to Install the Library in Proteus

Introduction: The nRF24L01 is a popular wireless module used in many IoT and electronics projects. Proteus is a powerful simulation software that allows you to design and test your electronic circuits before building them. To simulate the nRF24L01 in Proteus, you need to download and install the nRF24L01 Proteus library. In this article, we'll provide you with the download link and a step-by-step guide on how to install and use the library.